Printing the Tiled Image
-
Click
 .
.
-
In Tiling, select one of the tiling methods shown below.
Set the number of tiles and the tile size.
- Manual Tiling: You can set the number of tiles and the tile size separately.
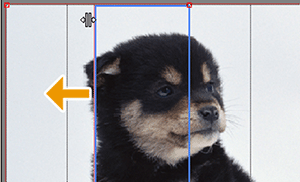
- On the preview image in the layout area, point to the top tiling line (the blue line). The pointer changes to
 .
. - If you point to the red square (the clip point) on the tiling line, the pointer changes to a
 shape. When dividing the image, point to any point other than the clip point on the tiling line.
- If you point to the red square (the clip point) on the tiling line, the pointer changes to a
- Drag the tiling line downward and release it at the location where you want to divide the image. The image is divided into top and bottom tiles.

- If you want to further divide the image vertically, repeat steps a and b.
- Point to the left tiling line on the preview image. The pointer changes to
 .
. - Drag the tiling line to the right and release it at the location where you want to divide the image. The image is divided into left and right tiles. If you want to further divide the image horizontally, repeat steps c and d.
- Click the tile whose size you want to set.
- Enter the values for W (width) and H (height) in Tile Location.
- Dragging the tiling line when the pointer becomes a will only move that tiling line.
- Moving the pointer closer to the left side of a horizontal tiling line will change the pointer to
 . Dragging the tiling line in this state will simultaneously move all the tiling lines to the right of the dragged tiling line while keeping the tile widths.
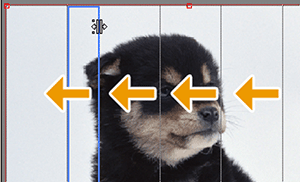
- Dragging the tiling line when the pointer becomes a
- On the preview image in the layout area, point to the top tiling line (the blue line). The pointer changes to
- Tile Size: Divides the job evenly at the specified size with the origin at the upper-left corner of the media. The tiles on the right and bottom edges may be smaller than the specified size.
- Select the tile size from the Size list. If you want to set a size other than the standard sizes, select CustomCUT or CustomROLL, and then enter the width and length.
- Number of Tiles : Divides the job into the number of tiles specified with Horizontal and Vertical. All the tiles will be the same size.
- Place alternated: The tiles in even-numbered columns will be rotated 180 degrees.
- Manual Tiling: You can set the number of tiles and the tile size separately.
-
Click
 .
You can use the layout area to check how the tiled image is arranged on the media.IMPORTANT: To arrange the layout, drag the preview of the tiled image directly or click
.
You can use the layout area to check how the tiled image is arranged on the media.IMPORTANT: To arrange the layout, drag the preview of the tiled image directly or click or
or  .
. -
Click
 .
The Advanced Print Settings window appears.
.
The Advanced Print Settings window appears.