
Correcting the Position of Spot Color Plates
Procedure
-
Perform the operation shown below according to what is being set.
- Job: Double-click the job to open the Job Settings window.
- Queue folder: Click
 for the queue folder to open the Queue Properties window.
- Click
 .
. - Use Mode under Quality Settings to select the mode including the spot color.
- Click
 .
. - Use the Spot Color list under Special Color Plate Correction to select the spot color ink to correct.
- Click Test Print under Position Correction. The Test Print dialog box appears.
- Select Pattern Settings.
- Simple
- Select this to make rough adjustments to position misalignments.
- Details
- Select this to make detailed adjustments to position misalignments.
- Simple
- Click OK. A test pattern is printed.
- Correction position and printing position in the horizontal direction

- Correction position and printing position in the vertical direction

- Correction position and printing position in the horizontal direction
- Enter the Horizontal and Vertical correction values. Select the values on the printed test pattern that make the misalignment between A (the black line) and B (the spot color line) the smallest. Enter the C values (which represent the Horizontal and Vertical correction values) written on the test pattern.
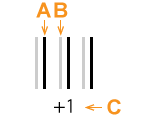
A Black line (reference line)
B Spot color line
C Correction value
IMPORTANT The test pattern correction values differ for each piece of data. Set the correction values for each piece of data. - Click OK. If you have to adjust the size of the spot color printing data, proceed to "Correcting the Size."